
Network Bandwidth Latency and Delay Simulation Tutorial
In this tutorial I am going to show you the easiest and most flexible way I know of simulating different types of network connections without having to install anything. This process requires a few easily obtainable pieces of hardware that I will detail below. I will begin by summarizing my research on this topic and finish with a tutorial on how to use the FreeBSD Frenzy live CD with dummynet to simulate different network conditions.
An invaluable tool for any network engineer, web programmer, Flash programmer, game developer, video streaming engineer or basically anyone involved with computer networks is the ability to simulate different types of network situations. I have needed an easy way to induce poor network conditions when testing applications for a long time, but after some research it is actually a complex thing to do unless you natively live in the Linux world.
Results of First Trying to do this in Windows
There are applications for Windows that allow this type of network simulation but none of them to my knowledge are freely available. I am also strongly against
installing anything that makes significant changes within my system. When researching doing this on Windows I routinely came across the QoS method, but this
requires the router and all network devices involved to support QoS. It also doesn't give us many options when testing. From the article "Throttling Bandwidth
through QoS(Part 1)" at WindowsNetworking by Brien M Posey:
"In order for QoS to work, every hardware component between the sender and the receiver must also support QoS. This means that NICs, switches, routers, and anything
else that might be in use must all be QoS aware, as must the sender and the receiver's Operating Systems."
This is way too limiting for me and doesn't offer much flexibility.
There are also quite a few pieces of software in Windows that allow you to change network conditions, but they are expensive or I couldn't get them to work. Another article I came across, "How To: Simulate WAN Connections in Your Own Test Lab, For Free!" by Michel Roth gives an overview of two of these applications and how he uses them with Citrix. NetLimiter and Tmnetsim. NetLimiter costs money and I don't need to simulate traffic every day. Only once in a while. I actually installed Tmnetsim on my XP 32bit system and couldn't get it to work worth a darn. I also want to easily modify my entire connection, not specific ports. Another piece of Windows software I saw mention of all over was Shunra VE Desktop, which is another application with a free trail that you have to purchase. No thanks.
To make a much longer story short after reading and reading(and now after actually using it), the best tool for doing network simulation is Dummynet. The issue is that Dummynet is only available on the *nix platforms. They also have it for OSX. I don't want to install FreeBSD or a *nix platform just for doing traffic simulation once in a while. This is why we are going to be using a live CD that you dont have to install.
Equipment Needed
1. Spare Computer with 2 network interface cards (Im using a built in motherboard NIC and a PCI NIC)2. Crossover Cable
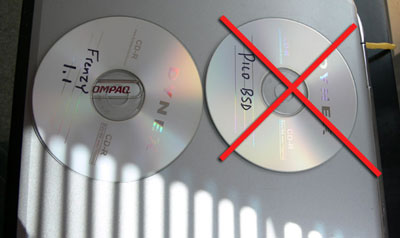
3. Blank CD - For burning the picobsd/Frenzy image to a bootable CD. (I couldn't get picobsd to work)
4. The computer you want to do application testing on (referred to as "test computer" below)
Summary
We will be using the computer with two network cards to crate a bridge between the rest of the network and the system(s) we want to simulate network conditions on.
A diagram is as follows:
Router/Switch -----> Standard Cat5 Ethernet Cable -----> Spare Computer with 2 NICS using Dummynet ---> Crossover Cable
---> test computer that we will see network changes on
Hooking up the Hardware
1. You should have a home router/switch, or a switch/wall plug in your office area that provides access to the Internet/main network. A standard Cat5 Ethernet cable should be connected from the Internet/main network source to one of the NIC's on the FreeBSD/Frenzy/Dummynet system. Below I have assumed that this connection provides access to a DHCP server of some sort that will automatically assign an IP.
2. From the second NIC on the FreeBSD/Frenzy/Dummynet system you should connect that to the test computer using a crossover cable. You could use a normal Cat 5 cable and connect the two, or several test computers using a switch if you really wanted to.
Configuring the OS From a FreeBSD Live CD
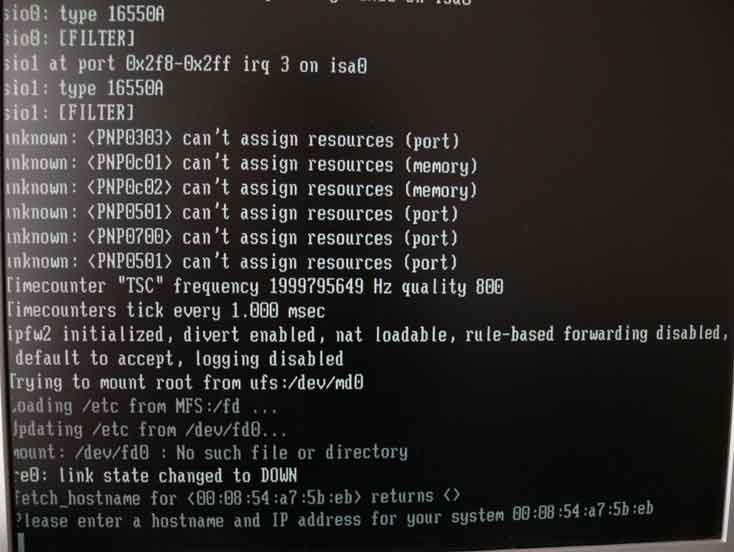
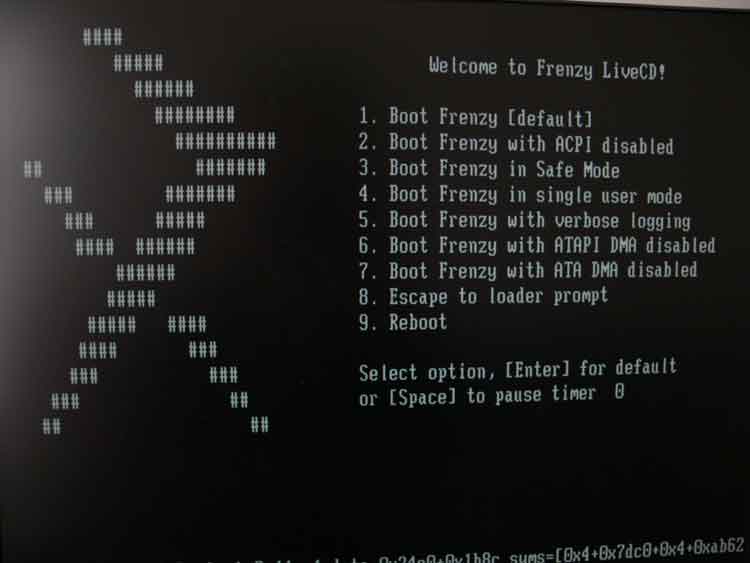
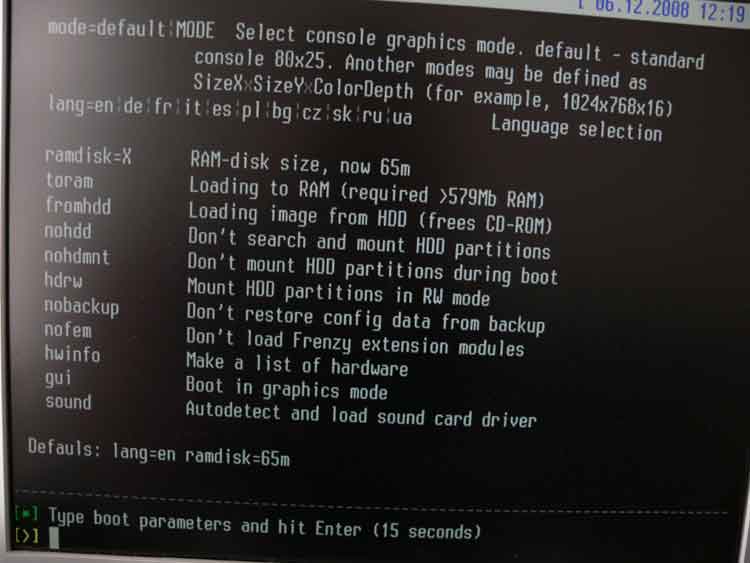
Step 2 - How to Boot Into Frenzy
When frenzy is done booting it will just dump you to a command line. To start the GUI type in the typical Linux command

Step 3 - Get a Terminal

Step 4 - Enable the ipfw Firewall for Bridge Mode
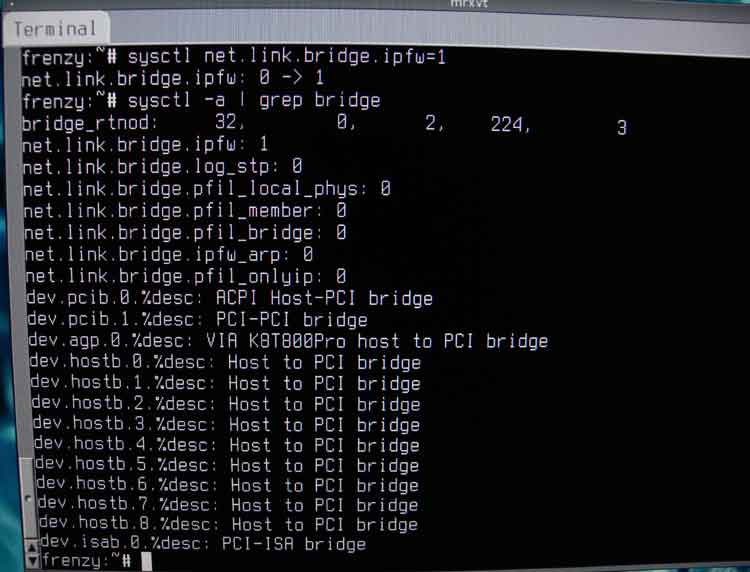
The first thing we need to do is enable ipfw for a bridge mode within the system configuration of Frenzy/FreeBSD. Ipfw is the network firewall that incorporates Dummynet. From what I understand, FreeBSD has several operating system level parameters that you can basically enable and disable. This is a live CD so we will not be configuring any files as many of the other dummynet tutorials assume. We will be doing this entire configuration directly from the terminal prompt.
We can use the "sysctl" command in order to view and set these operating system level options. In order to enable ipfw use the following command.
You should see the output "net.link.bridge.ipfw: 0 -> 1". If you want to view all the system options concerning the bridge you can use the command: "sysctl -a | grep bridge", but you dont have to.
Step 5 - Setup the Network Bridge
The next thing we need to do is get our bridge setup. On the system your going to be changing network parameters for and doing your testing on referred to as "test system"; you should still not see any usable network at this point.
In order to create a bridge we need to do the following: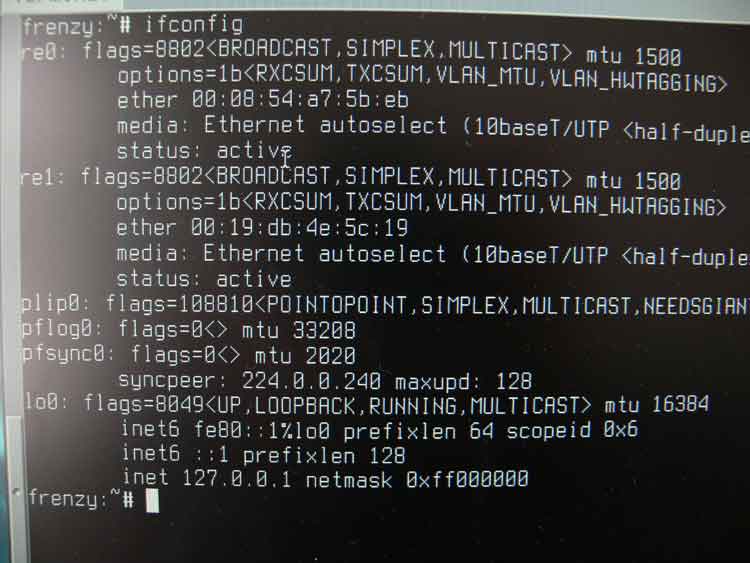
2. Get/Set an IP address on the network interface card connected to the switch/router with a normal ethernet cable.
3. Create a bridge
4. Add the network interfaces to the bridge
To figure out the names of all the network interfaces on the Frenzy/BSD machine, we need to use "ifconfig" which is pretty much the *nix version of the Windows "ipconfig". Type the following command into the terminal and look at the output.
If you haven't ever used ifconfig before this probably just looks like a bunch of junk. You basically have to look at all the parameters on the right and figure out which are the two physical NIC cards. In my case, they are "re0" and "re1". If you don't think both of your physical NIC's are in this list, you may have to install a driver for one/both of them. This is beyond the scope of this tutorial and you will have to do research on your own until you can continue.

The problem now is that I dont know which one of these is connected to the crossover cable and which is connected to the router/switch. I have DHCP running on my router that will automatically assign an IP address, so if we try and use DHCP on re0 and re1, we will be able to figure out which is the interface connected to the router when that interface is automatically assigned an IP address. Assuming you are in an environment with DHCP available, to set an ip address for the network interface connected to the router, do a dhcp request for both interfaces(assuming your interfaces are also named re0 and re1) using the commands:
It doesnt look like re0 is the interface connected to the router/switch. If you wait a few minutes you may see a series of requests followed by "No DHCPOFFERS recieved". Now do the same thing for re1.

We now need to create a bridge between the two interfaces to allow traffic from re1 to go to re0 and through the crossover cable to our test computer. Creating a bridge will basically let the Frenzy/BSD computer pass traffic between the router and test computer so the test computer can gain network access as well.
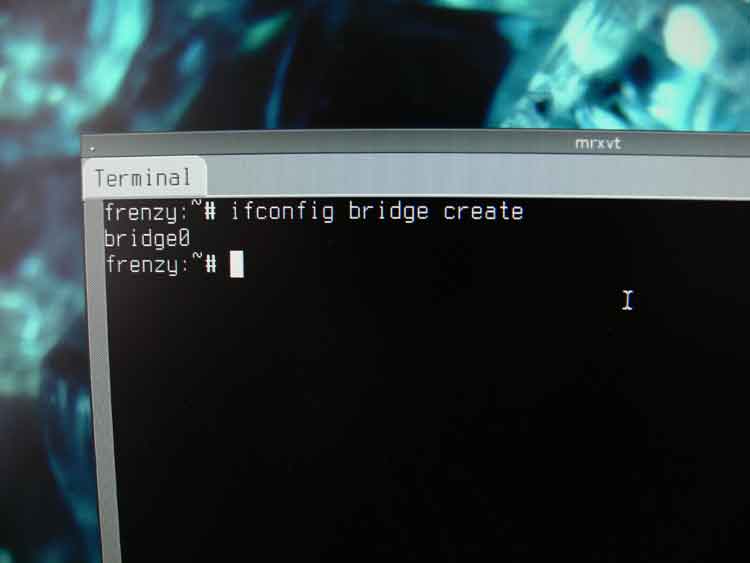
To create a bridge we will use ifconfig again with a few more parameters. Type in the terminal window:
Which should respond with "bridge0".
Step 6 - Configure The Bridge
Now add both of the network interfaces to the bridge we just created and activate it with the "up" parameter at the end. Assuming your network interfaces are named re0 and re1 you should add them to the bridge with the following command.
and
Assuming your bridge is working and you can access the internet/network on the test computer, we can now finally get into using dummynet to create different network conditions.
Step 7 - Using Dummynet From a FreeBSD Live CD For Network Testing
Although it retains the name Dummynet, you access dummynet settings via the "ipfw" command. The first thing we need to do is setup whats known as a "pipe" that basically tells the firewall where to send traffic. I want traffic to be sent and received straight through our Frenzy/FreeBSD box via our bridge so I am going to add one pipe for both send and receiving data.

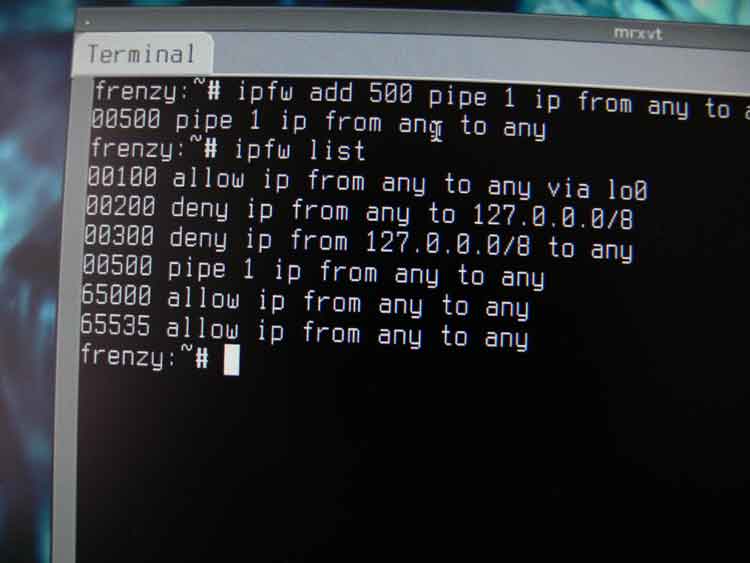
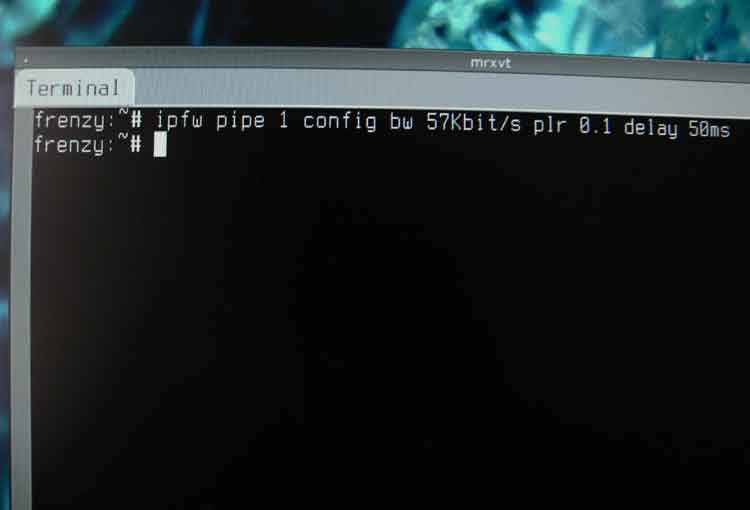
The above command will just change our 28kbit/s connection to the new parameters we just specified. Remember because I only set up one pipe, the bw 112kbit/s parameter is actually (112/2 = 56).
Step 8 - Testing
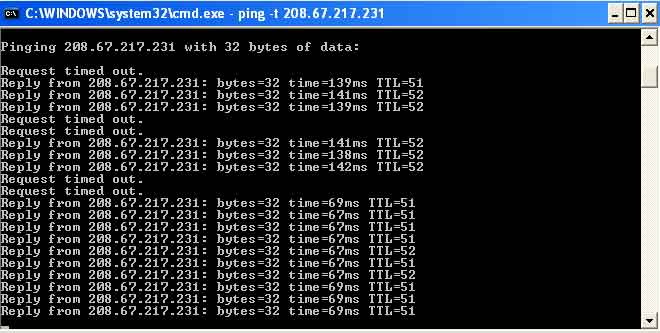
A cool way to at least check the delay parameter is to setup a constant ping to something on your test machine. My test machine is running Windows XP so I did a "nslookup' to determine the ip of google.com, then put a constant ping on them using the "ping -t" parameter. As I use the two commands above on the Frenzy/FreeBSD machine I can see the response times on the ping clearly change. Checkout the screenshot. See the response times for the first command when we were simulating a 28.8K dialup. Notice the "Request timed out" is due to the packet loss parameter we specified. After the 5th "request timed out" is when I switched to the 56K with no latency simulation. Notice the response time drop and removal of timeouts? If you have made it this far and want to find out more ways to simulate different types of connections, thankfully there is a lot of documentation online already concerning this. There are even parameters that allow you to specify only TCP or UDP traffic! Awesome!!!
I really hope that this has allowed people who have taken the time to setup all this achieve their desired traffic simulation results. I know this is a technique that wasn't easy to figure out, and I will definitely be using it in my personal as well as paid projects from this point forward. I hope that despite being discontinued, the Frenzy live CD remains available to those that have read this tutorial as it is the perfect live distribution for using Dummynet. It was still available at the time of writing. Thanks for reading.
Comments

Hi Ravi.
I have not tried this technique on windows. On that platform for limited development on one machine I use a commercial product called net limiter because I had to invest in it for a client project that was specifically testing with it. I have often had issues running network level software on win that centers around the winpcap drivers. My issues were with ostenato and wireshark though. I have never tried dummynet on win.

Hi Friend,
When I was going through the dummynet site, it says that it support window(32 and 64 bit) OS as well. Even I tried with the steps I came across different site and in some case network emulation is working as well. But the pblm I am facing is that it is not as smooth as it should.If you have any idea than please suggest the steps for window OS as well.so that I will bet get to know what wrong I am doing... thanks :)
Great article, thanks a lot for it!

Fantastic guide. Just wanted to thank you (and the authors of the comments, too).
Hi Craig. I have no idea if IPV6 is supported using this methodology. I never tested it when writing the article.
If anyone knows, I'd be happy to append it to the article and attribute credit!
Is IPv6 supported?

If anyone is interested here is an example I used recently.
This example will create two different pipes, one for incoming and another for outgoing traffic from the server. The criteria in this example is based on a 1Mbp/s link with a packet loss ratio of 10% and latency of 50ms. Note you do not want to include the PLR and delay on the outgoing traffic otherwise you would end up with 100ms of latency and 20% of packet loss.
ipfw add pipe 1 in
ipfw add pipe 2 out
ipfw pipe 1 config bw 1Mbit/s plr 0.1 delay 50ms
ipfw pipe 2 config bw 1Mbit/s

If you want to have a free solution working out of the box (linux live cd) and with a nice gui interface check out http://www.wanulator.de
I've done this twice at work the last two days and ran into an issue after the bridge was created.
For some reason I had to again, "up" both ethernet devices. So after the commands for
ifconfig bridge0 addm....
I had to also run
ifconfig re0 up
ifconfig re1 up
Chris,
I haven't done it in a while, but I think it should stop pinging. You have to continue on with the speed settings to let any traffic through.

the setup was pinging perfectly untill I added the command:
ipfw add 500 pipe 1 ip from any to any
After this, the frenzy machine was not able to ping anyone. Could you please help me as soon as possible!!!!! please!!!! thx
e88@live.co.uk
the setup was pinging perfectly untill I added the command:
ipfw add 500 pipe 1 ip from any to any
After this, the frenzy machine was not able to ping anyone. Could you please help me as soon as possible!!!!! please!!!! thx
We can ping from Frenzy to client. But the server is connected to the frenzy machine through a router. We cant ping from Frenzy to the router gateway, and therefore can't ping the server. Please E-mail me convoicon118@yahoo.co.uk ASAP. Thank you.
Great article which was extremely helpful. A couple of things I found with using version 1.3 of Frenzy.
Could not enable the firewall in bridge mode until I had created the bridge so
1. ifconfig bridge create
then
2. sysctl -a net.link.bridge.ipfw=1
Also there appeared to be some IPFW rules already in place so while the bridge worked I was unable to limit the bw, plr or delay on the bridge. So
Cleared out all rules with
ipfw flush
ipfw pipe flush
then created pipe
ipfw add 500 pipe 1 ip from any to any
cheers!
Hi David. I'm glad you found the article useful. Off the top of my head, is it possible your using a normal network cable and not a crossover between the bridge machine and your test machine?
If that's not it, I know setting up the bridge is one of the most convoluted aspects of the process.
Nice tutorial. But I am having trouble with getting the bridge to work correctly. It passes arp requests across the bridge but not the arp responses. Tried it with both frenzy 1.1 and 1.3. Anyone seen anything like this before? Thx.
Jamie,
Just because the network interfaces showed up named "re0" and "re1" on my system, doesn't mean they will be named that on yours. You have to figure out what the system names them prior to being able to do the commands.
If I remember right, I think the iwconfig command will show all of your network devices and their names.

HI
please help me someone
i cant get the bridge thing to work
every time i do the ifconfig re0 up and ifconfig re1 up, it keeps saying re1 doesnt exist!!! :(
please email me on adnaan88@hotmail.co.uk
other than that, this is great..
HELP ME PLEASE!!

This is the first dummynet tutorial I've been able to follow and get working fully! Well done and thanks!
Couple of notes I'd add. You don't need to give your interfaces IP addresses (unless like the author you're doing it to check which is which). The bridge puts them into promiscuous mode so they see all packets on all subnets anyway.
Make sure your Windows firewall is off or configured to reply to ICMP on the interfaces that are connected to the bridge.
Keep in mind the packet loss ratio is also doubled. For example if you set a plr of 0.1 (10%) you'll actually see a 20% loss for pings as there's a 10% chance it'll be dropped on the way to the remote host and a 10% chance it'll be lost on the return journey. If you setup a pipe for each direction you can ignore this.
You're both very welcome. This was something that I wanted to know how to do for a long time. I never even thought of using a USB NIC! Thats brilliant Rousey.
Fantastic, works a treat. I had a little trouble getting it to recognise USB NICs but have found the Belkin F5D5050 works so now I have a laptop based WAN simulator. If I could get Frenzy to boot from flash it would be perfect. Many thanks for sharing this.
Great tutorial. Thanks.
Comments are currently disabled.
