
Autonomous Two-Wheel GPS Driven Robot
Download the Complete Java NetBeans Project and Source Code
The purpose of this article is to help people interested in robotics, or utilizing GPS with software projects. I will do my best to include as many pictures and examples as possible in order to make this a tutorial that anyone that knows at least a little computer science can follow.
Software Used
1. Java JDK 5 with Netbeans IDE2. RXTX Serial Driver for Java
3.Hyperterminal in Windows, Minicom in Linux
Equipment Used
1. K-Team Hemisson Robot2. Garmin GPS-15L
3. Garmin GA25 MCX Antena
4. Two Standard Serial Cables (If no serial ports, Radio Shack sells a serial to USB cable that works well)
5. Soldering Iron and Solder
6. 3-AA(4.5V) battery mount extracted from a toy
7. A tupperware container for testing
8. Standard Coated Copper Wire
9. Radio Shack Standard Breadboard
10.1Ghz PIII laptop running Windows 2000 for testing
For People New to Robotics
One of the biggest problems I had when starting robotics was wrapping my mind around how autonomous robots work. I knew a lot about computer science, but had never worked with the integration of hardware. One of the easiest ways to get started with robotics is to start with a pre-built robotics platform like the Roomba vacuum or the K-Team Hemisson and build software on top of the existing architecture. Both of these platforms are affordable and can be issued drive controls through USB or serial port input. So lets say I want to tell the Hemisson to turn around in circles. All I need to do is open up Hyperterminal, connect a serial cable to the Hemisson and then type "D,9,0". This tells the Hemisson turn the left wheel at a speed of 9 and the right wheel at a speed of zero. This continuous issuing of drive commands through a Java application instead of Hyperterminal is the basis for the entire tutorial.Hardware Preparation
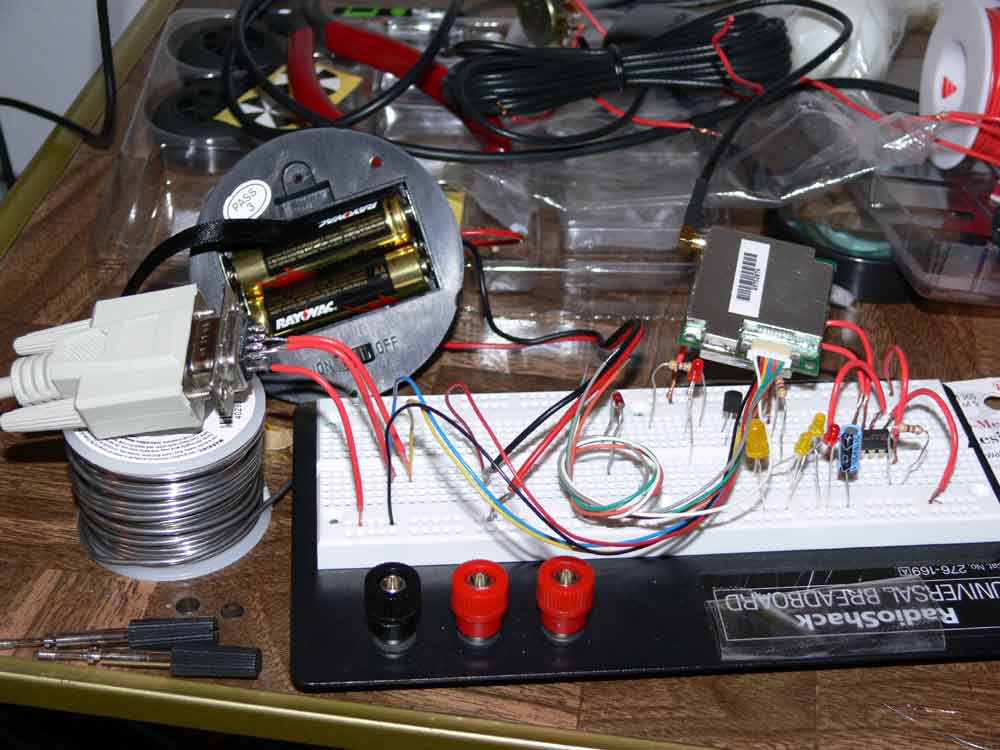
Before being able to start programming, it was important to find a suitable GPS unit that could later be integrated into our pre-built robotics platform and get it hooked up to the computer. The Garmin GPS-15L was selected for its small size, (not much bigger than a quarter), accuracy, low power consumption, output format (NMEA 0183), and affordable price. The GPS15-L is an OEM gps device, so a small amount of electrical engineering must be done prior to using the device.GPS Electrical

Hemisson Robot
The only modification made to the robot was to upgrade its firmware. No hardware modifications were needed due to the fact that the Hemisson already has a serial port on it. New firmware can be obtained from the K-Team website.Software Preparation
RXTX
The Java platform does not come standard with a serial driver that would work both on Linux and in Windows. For that reason, I used the RXTX serial driver for this application. Instructions about how to get the RXTX library to be recognized and usable within the windows JDK can be found in this DevX Forum posting. Essentially place rxtxserial.dll into the jdkversion/jre/bin folder and rxtxcomm.jar into the jdkversion/jre/lib/ext folder. Once RXTX is installed, you should be ready to start programming!Programming
In this section of the tutorial I will do my best to highlight some of the sections of the code that may cause confusion as well as provide a general explanation of the architecture of the application.Architecture Overview
This application was written with future expansion and the addition of more sensors in mind. The main class of the application is called GPS_GetUI. Each class in this application has a specific task related to it.GPS_GetUI- The GUI and main class of the application
Serial_Port - Utilizes RXTX to handle communication to the Serial Port
Hemmi_Control - Handles functions related to preparing data for the robot
GPS_Assist - Contains functions for GPS related calculations
Hemisson_Measurements - A test function for the second Hemisson nav algo
Detailed Class Descriptions
GPS_GetUIThis class contains all of the functions related to the GUI(which is handled by Netbeans). The most important function in this class is called "Gps_Drive". This function is called when autonomous navigation mode is started. It starts an action listener that runs the main loop that runs the functions that handle autonomous navigation every 1.5 seconds. **If you would like to add additional sensors to the navigation sequence, they should be added within this action listener.** This class also contains functions called "Robo_Handle_GPS" and "Robot_Handle_Lat_Long_Azemuth". Robot_Handle_GPS handles obtaining GPS coordinates and Robot_Handle_Lat_Long_Azemuth interprets those coordinates and tells the robot where to go. These functions are in GPS_GetUI because they both access the serial port, so a way of managing access to the port was to have them both inside the same class.
Serial_Port
Probably the most complicated procedure in this class is all of the functions that combine to read in from the serial port. This application was developed originally using only one serial cable for two devices. The GPS only used input and the robot only used output. However, both of these connections needed to be done at different speeds. Hence, because I was only using one cable, NOT MORE THAN ONE SERIAL CONNECTION USING THIS CLASS CAN BE OPEN AT ONE TIME. This is a major problem because the final implementation of the robot uses two separate serial cables. When functioning, this application rapidly opens and closes each serial port at a different speed. The class was originally developed in order to facilitate just one serial cable for two devices. If you would like to use persistent connections, the synchronization within the class will need to be re-written.
Reading GPS data in from a serial port
Reading in from a serial port is just like reading in from a file that is infinitely long. So what you do is create what is called a "buffer" to examine the input from the serial port and determine when you have a complete chunk of data. A complete chunk of data from the GPS unit, in this case a $GPRMC string looks like this.$GPRMC,163126,V,4335.2521,N,08446.0900,W,000.0,173.2,051206,006.1,W*62
So in the buffer you look for an end line character then a '$' character to extract a full sentence. We then just parse this string to extract what we want. In order to read in from the GPS unit, the connection is opened using Connect. Then the function called Get_Byte_Stream_As_String is called with the number of bytes you want to examine and the delimiter that lets you know when you are at the start of a new input line (in our case this is a '$' character). Get_Byte_Stream_As_String makes sure we have the correct parameters and that the serial port is open. It then calls SerialEvent SerialEvent is the buffer that we talked about earlier. It reads in data from the serial port until it successfully extracts a $GPRMC string. It then returns this string to Get_Byte_Stream_As_String. After this is done, you should call Disconnect to close the serial port.
Writing data to the serial port
Writing data to the serial port is also much like writing to a file. We first use Connect to make a connection to the serial port then we simply call Send_Data with our data as a string for the parameter. Writing to a serial port is much easier then reading because we do not have to worry about a buffer. An example of a string that is written out to the Hemmison is "D,5,5" this tells the robot to turn both its left and right wheels at a speed of 5. Again, make sure to call Disconnect to close the port when you are done.GPS_Assist
This class is used for interpreting the GPS data and doing navigation calculations once we have extracted it from the serial port. Parse_GPS is used to extract the important information from the $GPRMC string. In this instance the Latitude, Longitude, and Compass Heading(0-360 degrees). I have made these bold in the example $GPRMC string above. A compass heading isn't always obtained so Parse_GPS returns and unrealistic value of 555555 as the heading if it isn't obtained. The most complicated calculations in the entire program are done in GPS_Distance_Heading. This takes in the parsed coordinates obtained from the GPS and destination coordinates and calculates the distance between the points (Great Circle Navigation). It then uses the calculated distance to determine the angle between the two points (Bearing Formula). The coordinates used by the Bearing and Great Circle Navigation formulas are in radians, so the function GPS_TO_RAD is used to convert the coordinates from ddmm.mm into dddd.dd then radians. The distance is returned from GPS_Distance_Heading as land miles and heading as degrees (0-360).
Hemmi_Control
This class contains all of the functions that are specific to the Hemmison robot and contains adjustable static variables that alter the behavior of the bot. This class should be modified if you are using a different robot. The most important functions in this class are PowerFromDistance and DetermineBestSpeed. PowerFromDistance determines the appropriate power level for the robot based on how far the bot is from its target. The bot is currently slowed down when it gets closer to the target. DetermineBestSpeed takes the power level from PowerFromDistance and then looks at the angle the bot needs to turn and picks the best suitable wheel speeds. This is accomplished by a large hash table that contains all of the measured turn angles at every possible foreword speed. To use this way of determining wheel speed for your bot, you will need to replace the measurements in the hash table with your own bots measurements and power levels.
**An adjustment to PowerFromDistance will fix the circling of the target problem seen in the video.
Hemisson_Measurements
This class is not used. You can use it to test new navigation algorithms.
Comments

The simple answer is no. The Antenna that I use with this unit is really junky. You have to have this antenna in a wide open area in order to get it to pick up things. I know there are units that are sold that include an antenna. If you get one, I would be interested to know how it works out?

Hello Charles, and greetings from Egypt :) Nice robot. Thanks for sharing! I'm considering using the same GPS for a project, and I was wondering if it works at all without the Antenna? Thanks again.
Comments are currently disabled.
